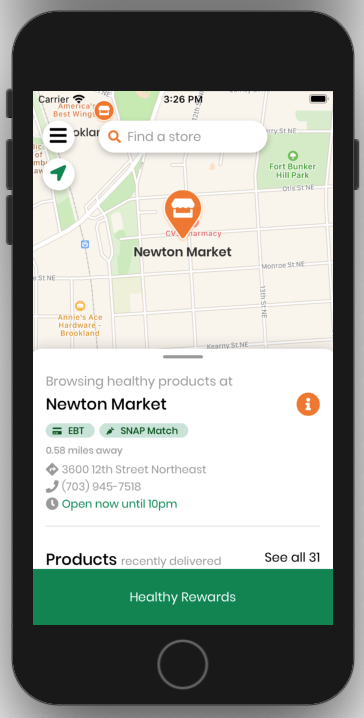
# Map Screen
This document runs through the different components within the main MapScreen that a user uses to discovers stores and products.
TIP
See Customer PR #184: Refactor MapScreen to functional component (opens new window) for more details on how MapScreen, related helper functions, and custom hooks work.
The different components/sections relevant for the MapScreen are as follows:

# Map
- The map uses the component
MapView, which is imported from the packagereact-native-maps(opens new window)
# Store Markers
- These store markers are rendered on the map based on where the different grocery/corner stores are.
- Clicking on these store makers automatically navigates the map's area to where the store is, focuses the store marker, and displays the store's information on the Bottom Sheet (more details below).
- Supported by helper function
changeCurrentStore()
- Supported by helper function
# How to modify
The icon images
- Navigate to file
components/store/StoreMarkers.jsand change the icons for the markers, for both the resting and focused state.
- Navigate to file
Callback action / What happens when you click on the markers
- Modify either the
onPresscallback function to call a different function, or modify the current helper function used (changeCurrentStore())
<Marker key={store.id} coordinate={{ latitude: store.latitude, longitude: store.longitude, }} onPress={() => this.changeCurrentStore(store)}>- Modify either the
# Search Bar
- Essentially a styled button
- Clicking on the search bar brings the user to the
StoreListScreenwhere they can browse the full list of stores.
# How to modify
- The component is found within
styled/store.js/ - The margins and paddings can be modified for the component there
# Center location button
- Button only renders if location services is enabled on user's device
- Clicking on this button brings the map to where the user currently is, and also displays the closest store to the user on the bottom sheet
- NOTE: this doesn't actually re-fetch the user's location -- it just centers the screen on the user's location when it was initially fetched.
# Hamburger menu button
- Button to toggle the drawer menu, showing different screens that the user can navigate to
# BottomSheet
- Component imported from the package
'reanimated-bottom-sheet' - Takes in several different props as seen below, configured for the best user experience
To modify the content, see the two functions below
# renderHeader()
- Necessary to allow users to move the Bottom Sheet
- Only shows a small black bar, indicating the region where the user can hold and drag to move the BottomSheet
# renderContent()
- Renders the content from component
StoreProducts, which contains basic store information and list of products that are being delivered
# BottomSheet heights
- This section runs through how the height of the
BottomSheetin theMapScreenis calculated and determined. - The heights are labelled as
snapPoints, for which there are a total of three values.minSnapPoint– lowest height the sheet can gomidSnapPoint– mid-level. This is the height that the sheet starts with, providing a quick view of the store's important information while having a decent view of the map.maxSnapPoint– highest height of the sheet.


minSnapPoint, midSnapPoint, and maxSnapPoint above
BottomSheet documentation can be found here (opens new window).
# How the values are calculated
Current values are stated below. The values are in
ptunits, as required by theBottomSheetpackage.const minSnapPoint = 185; const midSnapPoint = 325; const maxSnapPoint = 488;The values seen above are done after rough estimation and testing by visually accounting how it looks like on phone screens of different sizes.
Read the next section to see an example of how we estimated the values for
maxSnapPoint. The same process is done for the other snap points as well.
# Estimation (maxSnapPoint)
- Estimating pixel (
px) height from bottom of the screen- Green Healthy Rewards Tab:
70px - Height of
BottomSheetwhen fully expanded:~540px - Adjustment pixels (after testing):
40px - TOTAL:
650px
- Green Healthy Rewards Tab:
- Converting to
ptvalue650px * 0.75 = 487.5pt- Rounded up to final value of
488pt
# Healthy Rewards Footer
Clicking on the footer brings the user to the RewardsScreen.
The footer display changes depending on the user's guest and points status:
- If the user is logged in and has rewards, show # of rewards
- If the user is logged in and has NO rewards, show # of points
- If the user is signed in as a guest, show "Learn about Healthy Rewards"
Customer PR #149: Rewards Footer (opens new window)
# mapUtils helper functions
There are several custom hooks that are used as helper functions:
# useCurrentLocation()
- Prompts the user for location access. If location services are granted, set the user's location in
currentLocation(otherwise null). - Location permission status is saved in
locationPermissionsas either 'granted', 'denied', or 'error'.
# useStores()
- Loads the list of stores from Airtable, not in any sorted order.
# useStoreProducts()
- loads the products for
currentStore, refreshing whenevercurrentStoreis updated.
# findStoreDistance(region, store)
- Finds the distance in miles from a reference region/location to a store object.
- Returns
nullif the store distance is greater than 100 miles.
← Stores Rewards Screen →